Showing posts with label Tutorials. Show all posts

How To Host Any Kind Of File On Your Blog

We all know that, blogger does not allows file storage other than Picture and text, we can also embedd videos from other video sharing platforms like Youtube. To enable direct down load form your blogger, you should purchase a domain from Google to host your files. How about hosting files for free in your blogger. This article covers all possible solutions to enable file hosting in your blogger to give direct download links to your readers.

What is a direct download?, when a reader click on a particular link in your blog, download is initiated without being redirected to any other web page or file hosting services. This gives your blog a competitive edge over other free blogs. The readers will love this feature. There are two possible solutions for this dilemma without spending a single cent.

1) Host your Files in your P.C
2) The Use Google Sites

Hosting files In your P.C- Turn Your P.C to A Dedicated Server

First if all you need a simple programme to host files in your P.C. The Programme is called HFS(HTTP file server)and you can download HFS from this Link. If you have a third party firewall installed, configure it to allow HFS to the trusted App section. By default HFS uses port 80, if your firewall blocks port 80, configure HFS to any free port like 1024 or 8025.

If you are behind a router, you need to refer the port forwarding tutorials Here . Now you should Test HFS settings.


The next step is to register a free domain from no-ip.com. Go to no-ip.com and Create a new user at No-IP account.

Once you are finished with the registration Log-in to your account and click on “Hosts/Redirects”.

Now Click on "Add" link in left sidebar.


This will help you to create a domain in conjunction with your IP address. Click on "Create a Host" to publish your website.


Now you are ready to launch your site.


You can now decide what page will appear when someone access your site, like the default page.To change the default page,
  • Open HFS and click on “You are in Easy Mode ” to turn it to advance mode.
  • Right click on little house icon on VFS and click on “Bind Root to Real Folder”.
  • Now you can add files and folder here which you want to make available in your website.
  • Next is when your site is ready send the address which you created in NO-IP or step 4 to all your friends.
  • You can even see what others are viewing in advanced mode of hfs
Now we learned about tuning your p.c to a dedicated file hosting server. If you come across any trouble during configuration, you can refer this guide

Hosting files in Google For free

Now we are going to discuss about the simple easy method to host any types of files for free, to enable direct download in your blog. Assuming that you all guys have  a working Google account. This site is a phenomenon, go to Google Sites. Google sites helps you to make hosting your files much much easier. You will get 100 MB free storage per google account. If you need 1GB storage, you should have a 10 Google account.

Now sign in with your Google account user name and password. Create a site, it is so easy to do. Unfortunately Google sites does not permits direct uploading of .exe files. No need to worry, we can convert it to a .rar file or .zip file using either WinRar or WinZip, now you can upload it. As your blog getting popular and popular, you need to give more to your readers, so create multiple Google account and, increase your storage as per your requirement. Log in to your site, create file Cabinet page and add your files. Review the screen shot for getting downloading links.


Hosting Document Files With Word-press For Free

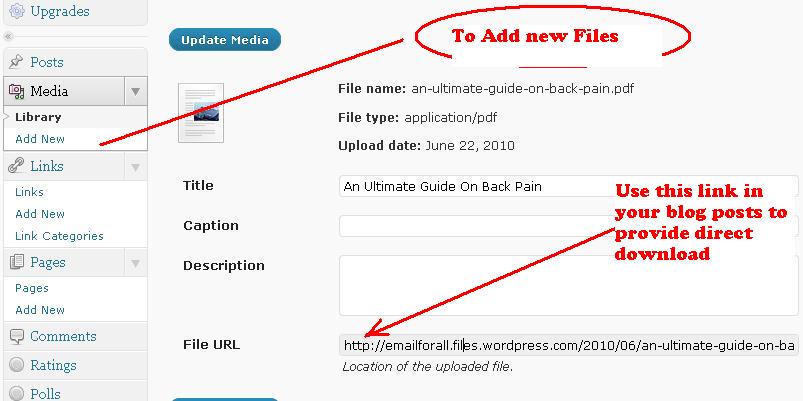
Word-press gives you the chance to host your documents. You have 3GB space per Wordpress account. These are the allowed file types: jpg, jpeg, png, gif, pdf, doc, ppt, odt, pptx, docx.


Suppose if you want to start a blog on Ebook downloads, you can download ebooks from torrents or rapidshare and Just upload it to Wordpress, you can give direct download links to your blog documents using this feature.


Think I have helped you a bit.
Happy reading.
mathewf4rr3l


How Contact Google Support on Any trouble.

Although Google help center Provides necessary details about almost all possible topics, there are situation where you are looking for a person to respond to your query.

These are some useful links to contact Google  Customer service.


1) Forgot your password, Do not have Access to your primary email

Go to the link below and select "no". Enter your details and submit. This way is so fast and You will get sooner results.

Contact Google Support

2) For trademark related Queries

Contact Google support

3) For incorrect IP tracking

Contact Google support


4) When you see We're Sorry' page

Contact Google support


1. Main phone number - (650) 253-0000, press “5″ for Customer Service or Tech Support, where you will then be directed to the Google website where you can submit an email.

2. Google Adwords Advertising - (866) 246-6453, press “2″ for Adwords questions.

SOme Great Photoshop Tutorials, All you Need To be A Designer

http://www.fileserve.com/file/mRxsx5J/Advanc3d_Artistry_Tut0rials.part1.rar
http://www.fileserve.com/file/2Re2jR7/Advanc3d_Artistry_Tut0rials.part2.rar
http://www.fileserve.com/file/3KPKkrr/Advanc3d_Artistry_Tut0rials.part3.rar
http://www.fileserve.com/file/dQbDzCs/Advanc3d_Artistry_Tut0rials.part4.rar
http://www.fileserve.com/file/uXh4JXY/Advanc3d_Artistry_Tut0rials.part5.rar
 
http://freakshare.net/files/pw01a8aa/Advanc3d_Artistry_Tut0rials.part1.rar.html
http://freakshare.net/files/fpsxvak1/Advanc3d_Artistry_Tut0rials.part2.rar.html
http://freakshare.net/files/cvoe9sv2/Advanc3d_Artistry_Tut0rials.part3.rar.html
http://freakshare.net/files/jwa5xm47/Advanc3d_Artistry_Tut0rials.part4.rar.html
http://freakshare.net/files/ry9hg3a1/Advanc3d_Artistry_Tut0rials.part5.rar.html 
http://hotfile.com/dl/48657823/05ee573/Advanc3d_Artistry_Tut0rials.part1.rar.html
http://hotfile.com/dl/48657837/f677ab9/Advanc3d_Artistry_Tut0rials.part2.rar.html
http://hotfile.com/dl/48657810/d951348/Advanc3d_Artistry_Tut0rials.part3.rar.html
http://hotfile.com/dl/48657820/69750cd/Advanc3d_Artistry_Tut0rials.part4.rar.html
http://hotfile.com/dl/48657828/76fadbb/Advanc3d_Artistry_Tut0rials.part5.rar.html 

10 Remedies For Windows Boot failure

#1: Use a Windows startup disk

One of the first things you should reach for when troubleshooting a Windows XP boot problem is a Windows startup disk. This floppy disk can come in handy if the problem is being caused when either the startup record for the active partition or the files that the operating system uses to start Windows have become corrupted.

To create a Windows startup disk, insert a floppy disk into the drive of a similarly configured, working Windows XP system, launch My Computer, right-click the floppy disk icon, and select the Format command from the context menu. When you see the Format dialog box, leave all the default settings as they are and click the Start button. Once the format operation is complete, close the Format dialog box to return to My Computer, double-click the drive C icon to access the root directory, and copy the following three files to the floppy disk:

* Boot.ini
* NTLDR
* Ntdetect.com

After you create the Windows startup disk, insert it into the floppy drive on the afflicted system and press [Ctrl][Alt][Delete] to reboot the computer. When you boot from the Windows startup disk, the computer will bypass the active partition and boot files on the hard disk and attempt to start Windows XP normally.

#2: Use Last Known Good Configuration

You can also try to boot the operating system with the Last Known Good Configuration feature. This feature will allow you to undo any changes that caused problems in the CurrentControlSet registry key, which defines hardware and driver settings. The Last Known Good Configuration feature replaces the contents of the CurrentControlSet registry key with a backup copy that was last used to successfully start up the operating system.

To use the Last Known Good Configuration feature, first restart the computer by pressing [Ctrl][Alt][Delete]. When you see the message Please select the operating system to start or hear the single beep, press [F8] to display the Windows Advanced Options menu. Select the Last Known Good Configuration item from the menu and press [Enter].

Keep in mind that you get only one shot with the Last Known Good Configuration feature. In other words, if it fails to revive your Windows XP on the first attempt, the backup copy is also corrupt.

#3: Use System Restore

Another tool that might be helpful when Windows XP won't boot is System Restore. System Restore runs in the background as a service and continually monitors system-critical components for changes. When it detects an impending change, System Restore immediately makes backup copies, called restore points, of these critical components before the change occurs. In addition, System Restore is configured by default to create restore points every 24 hours.

To use System Restore, first restart the computer by pressing [Ctrl][Alt][Delete]. When you see the message Please select the operating system to start or hear the single beep, press [F8] to display the Windows Advanced Options menu. Now, select the Safe Mode item from the menu and press [Enter].

Once Windows XP boots into Safe mode, click the Start button, access the All Programs | Accessories | System Tools menu, and select System Restore. Because you're running in Safe mode, the only option on the opening screen of the System Restore wizard is Restore My Computer To An Earlier Time, and it's selected by default, so just click Next. Then, follow along with the wizard to select a restore point and begin the restoration procedure.

#4: Use Recovery Console

When a Windows XP boot problem is severe, you'll need to use a more drastic approach. The Windows XP CD is bootable and will provide you with access to a tool called Recovery Console.

To boot from the Windows XP CD, insert it into the CD-ROM drive on the problem system and press [Ctrl][Alt][Delete] to reboot the computer. Once the system begins booting from the CD, simply follow the prompts that will allow the loading of the basic files needed to run Setup. When you see the Welcome To Setup screen, shown in Figure A, press R to start the Recovery Console.

Figure A


You'll then see a Recovery Console menu, like the one shown in Figure B. It displays the folder containing the operating system's files and prompts you to choose the operating system you want to log on to. Just press the menu number on the keyboard, and you'll be prompted to enter the Administrator's password. You'll then find yourself at the main Recovery Console prompt.

Figure B


#5: Fix a corrupt Boot.ini

As the Windows XP operating system begins to load, the Ntldr program refers to the Boot.ini file to determine where the operating system files reside and which options to enable as the operating system continues to load. So if there's a problem rooted in the Boot.ini file, it can render Windows XP incapable of booting correctly.

If you suspect that Windows XP won't boot because Boot.ini has been corrupted, you can use the special Recovery Console version of the Bootcfg tool to fix it. Of course, you must first boot the system with the Windows XP CD and access the Recovery Console as described in #4.

To use the Bootcfg tool, from the Recovery Console command prompt, type

Bootcfg /parameter

Where /parameter is one of these required parameters:

* /Add--Scans the disk for all Windows installations and allows you to add any new ones to the Boot.ini file.
* /Scan--Scans the disk for all Windows installations.
* /List--Lists each entry in the Boot.ini file.
* /Default--Sets the default operating system as the main boot entry.
* /Rebuild--Completely re-creates the Boot.ini file. The user must confirm each step.
* /Redirect--Allows the boot operation to be redirected to a specific port when using the Headless Administration feature. The Redirect parameter takes two parameters of its own, [Port Baudrate ] | [UseBiosSettings].
* /Disableredirect--Disables the redirection.

#6: Fix a corrupt partition boot sector

The partition boot sector is a small section of the hard disk partition that contains information about the operating system's file system (NTFS or FAT32), as well as a very small machine language program that is crucial in assisting the operating system as it loads.

If you suspect that Windows XP won't boot because the partition boot sector has been corrupted, you can use a special Recovery Console tool called Fixboot to fix it. Start by booting the system with the Windows XP CD and accessing the Recovery Console as described in #4.

To use the Fixboot tool, from the Recovery Console command prompt, type

Fixboot [drive]:

Where [drive] is the letter of the drive to which you want to write a new partition boot sector.

#7: Fix a corrupt master boot record

The master boot record occupies the first sector on the hard disk and is responsible for initiating the Windows boot procedure. The master boot record contains the partition table for the disk as well as a small program called the master boot code, which is responsible for locating the active, or bootable, partition, in the partition table. Once this occurs, the partition boot sector takes over and begins loading Windows. If the master boot record is corrupt, the partition boot sector can't do its job and Windows won't boot.

If you suspect Windows XP won't boot because the master boot record has been corrupted, you can use the Recovery Console tool Fixmbr to fix it. First, boot the system with the Windows XP CD and access the Recovery Console as described in #4.

To use the Fixmbr tool, from the Recovery Console command prompt, type

Fixmbr [device_name]

Where [device_name] is the device pathname of the drive to which you want to write a new master boot record. For example, the device pathname format for a standard bootable drive C configuration would look like this:

\Device\HardDisk0

#8: Disable automatic restart

When Windows XP encounters a fatal error, the default setting for handling such an error is to automatically reboot the system. If the error occurs while Windows XP is booting, the operating system will become stuck in a reboot cycle--rebooting over and over instead of starting up normally. In that case, you'll need to disable the option for automatically restarting on system failure.

When Windows XP begins to boot up and you see the message Please select the operating system to start or hear the single beep, press [F8] to display the Windows Advanced Options Menu. Then, select the Disable The Automatic Restart On System Failure item and press [Enter]. Now, Windows XP will hang up when it encounters the error and with any luck, it will display a stop message you can use to diagnose the problem.

#9: Restore from a backup

If you can't seem to repair a Windows XP system that won't boot and you have a recent backup, you can restore the system from the backup media. The method you use to restore the system will depend on what backup utility you used, so you'll need to follow the utility's instructions on how to perform a restore operation.

#10: Perform an in-place upgrade

If you can't repair a Windows XP system that won't boot and you don't have a recent backup, you can perform an in-place upgrade. Doing so reinstalls the operating system into the same folder, just as if you were upgrading from one version of Windows to another. An in-place upgrade will usually solve most, if not all, Windows boot problems.

Performing a Windows XP in-place upgrade is pretty straightforward. To begin, insert the Windows XP CD into the drive, restart your system, and boot from the CD. Once the initial preparation is complete, you'll see the Windows XP Setup screen (shown earlier in Figure A). Press [Enter] to launch the Windows XP Setup procedure. In a moment, you'll see the License Agreement page and will need to press [F8] to acknowledge that you agree. Setup will then search the hard disk looking for a previous installation of Windows XP. When it finds the previous installation, you'll see a second Windows XP Setup screen, as shown in Figure C.

Figure C


This screen will prompt you to press R to repair the selected installation or to press [Esc] to install a fresh copy of Windows XP. In this case, initiating a repair operation is synonymous with performing an in-place upgrade, so you'll need to press R. When you do so, Setup will examine the disk drives in the system. It will then begin performing the in-place upgrade.

Keep in mind that after you perform an in-place upgrade or repair installation, you must reinstall all updates to Windows.

How to create a Windows XP Bootable CD using Nlite

I think many users already know about it.But it's the easiest process of making windows XP bootable cd from Windows XP files.So here we go:

Tools we need:

1.N-lite(Search Google) or go here:


http://www.nliteos.com/download.html
2.A folder having Windows XP files.
3.A Blank CD.
4.A CD/DVD RW Drive
5.Some common sense.

Process:
1.Download N-lite and install it.
2.Open N-lite and on the welcome screen click on next.
3.Now in the second windows,browse your folder with the Windows XP files.It will show you information about your OS.


4.After that click next.
5.Click next again.(On the Presets windows)
6.Then you will see many options.Just click on Bootable iso, if you wanna save or direct burn the image created by the n-lite.There are many other options,but they are for professionals or custom OS creators.


7.Click on Next.Then this window will pop-up.


here from the very first option.select what you want.Select Direct Burn if you want a direct burn to CD.Select Create image if you wanna create and save the image for burning later.
Type any Label in the Label option.
8.Click on Make ISo.
9.Click on Next.
Done!!!
Congratulations! You have created your own Windows XP installation CD with the non-bootable Windows Xp files.

How to Make Money From Shutterfly


There are so many image providers (Microstock Photography), who gives payouts for good photographs. For example Shutterstock.com, Istockphoto.com and fotolia.com. How can we make money through Shutterfly.com. If you put 100 % effort Shutterfly is the best place to start your own image services firm. Shutterfly is a wonderful company who delivers their orders 100% quality and in time. How can we use Shutterfly as a money making machine.

Shutterfly offers a unique platform for photographers to grow their own business. The service is known as Pro-Galleries. This tutorial is intended for both amateur and professional photographers. To know more about pro-gallery selling option, please click here

Shutterfly offers various photo products to pro-gallery owner's. To see a list of all products, click here . How you are going to make money. First of all you need to purchase a pro-gallery account. You can purchase a Pro-gallery account here . Now you have a pro-gallery account, and you are about to sell your images to customers all over the world. You will receive volume discounts for bulk purchases, you can give away some portion of this discount to your customers, still your profit will be huge. 

Features and Benefits


Their Professional Photo Gallery service is the best solution for selling your images online. We make it quick and easy for you to set up your own professional photo gallery for online proofing and sales. Here are some of the features and benefits of their service:

Sell the Print Sizes You Want: You choose which print sizes to sell. If you don’t want to sell 4×6’s, no problem, just exclude them from your price list.

Sell at the Prices You Want: You can adjust pricing for each individual gallery or for different audiences.

Offer discounts: Running sales is a great way to encourage customers to place orders and increase the amount that they spend with you. You can reward your customers by offering percentage off or free print promotions on the orders they place. Choose from over 100 discount options. Some examples of the types of discounts and promotions that you can offer: “10% off if you spend $100,” “Spend $50 and receive 1 8x10 Free,” or “Buy 5 4x6s and receive 1 4x6 Free.”

Grow your Business with Prints and Photo Gifts: Choose what you want to sell. If you don’t want to sell 4×6’s or photo Magnets, no problem, just exclude them from your price list. Make a selection to learn more about any of our photo products.

Note Cards Mugs Tiled Mugs
Mouse Pads Magnets Puzzles
Desk Organizers Keepsake Boxes Playing Cards

Sell the digital file: Digital Download enables your customers to use your professional images in more creative ways. Give your customers what they want and offer them the ability to purchase the image to be downloaded to their desktop. This will allow them to add them to social networking sites, back them up on CDs, and use them as screensavers.

Automatic Deposits: We deposit your profits directly into your account every month and send you monthly sales reports. Please note: If you reside outside of the US, we can direct deposit your revenue share into your foreign bank account as long as your bank accepts deposits in US dollars.

Personalized Website Address: Their system automatically generates a unique website address for you (e.g. www.shutterfly.com/pro/accountname/galleryname). You can either link the gallery address to your current website or give the gallery address to your clients. You can also get your own unique website address (e.g. www.galleryname.com) and have it point to your Shutterfly Pro Gallery storefront.

Unlimited Gallery Creation: There is no limit to the number of photo galleries you can create. You can create a unique gallery for each of your clients or events.

Watermark Protection: For added security and protection against illegal copying of your images, you have the option of applying a watermark to every photo gallery you create. You have 5 different options to choose from including no watermark.

Password Protection: You have the option of password protecting each photo gallery you create.

Back Printing: You can set your own back print messaging on 4×6 and 5×7 prints.

Customizable Index Print: (a print included in customer orders with thumbnail-size images showing all of the photos for that order).

Free Photo Editing Tools: Adjust your photos on your computer, or upload the unedited images and use Shutterfly’s tools to crop, change to black and white, apply borders or adjust saturation.

Order Reports: Access real time order reports 24×7. Track every detail of the order from file names and print sizes, to customer contact information for follow up marketing.

Performance Reports: Analyze your visitor activity and the most frequent images sold from your albums and galleries.

Free CD Mail-in Service: If you don’t have time to upload images to your account, send us your CD of images. We’ll upload them to your account for free!

PC and MAC friendly: Their site is friendly to both PC users and MAC users.

Professional Volume Discounts: Access to discounts for all Shutterfly products for fulfillment through your personal Shutterfly account.


To know more about marketing tips click here

How to Get rig Of A.V Security suite Virus?

The sites listed below will give you instructions on how to remove AV Security Suite... Hope it helps..

How to remove AV Security Suite (Uninstall Guide)
http://www.bleepingcomputer.com/virus-re…

How to uninstall and remove AV AntiSpyware
http://www.bleepingcomputer.com/virus-re…

How to Remove AV Security Suite Manually
http://www.411-spyware.com/remove-av-sec…

All about Class 3 Certificates and its use

A class 3 three certificate facilitates digital signing of a particular file, using your company name. This certificate is for your company internal purposes only. You could not use this with a software development Kit (SDK)

How to obtain a Class three certificate?

You should need the following files to get a Class 3 certification.

Wmla.zip (containing Wmla.ocx)
Signcode.zip (containing Signcode.exe

Step 1) You need to register with any of the following certificate authorities.


Certification authorityCertificate typeDirect Web URL
VerisignMicrosoft Authenticodehttp://www.verisign.com/code-signing/index.html
GlobalSignObjectSign certificatehttp://www.globalsign.net/digital_certificate/objectsign/index.cfm
ThawteMicrosoft Authenticode (Multi-Purpose) certificatehttps://www.thawte.com/core/process?retail-enrollment.enrollment-type=new-devel2
GeoTrustCode Signing Credentials for Microsoft Authenticodehttp://www.geotrust.com/signing-products/code-signing/


  1. Use the Signcode.exe tool (located in Signcode.zip, which was sent to you from wmla@microsoft.com) to sign/certify the attached Wmla.ocx file (located in Wmla.zip) using the certificate you obtained. You may also sign your files by using the utility supplied by your certificate authority.
     Important   Do not digitally sign an .exe file because Microsoft cannot receive them, even within a .zip file, due to virus checking.
  2. Send the signed file to wmla@microsoft.com. Include your company name in the e-mail message for clear identification.
    To confirm that your signature is correct, right-click the file, click Properties, and then click Digital Signatures.
  3. We will verify your signed file and confirm via an e-mail message.

How to spot fraudulent verisign certificates

 These certificates are untrusted by default, even if you have previously chosen to trust content from Microsoft; therefore, you always receive a warning dialog box if you encounter these certificates. Click Microsoft Corporation on this warning dialog box to identify these certificates. Microsoft recommends against running any content that is signed with these certificates.

Fraudulent Certificate 1
The first fraudulent certificate can be uniquely identified by the following properties on the Details tab:
  • Serial Number: 750E 40FF 97F0 47ED F556 C708 4EB1 ABFD
  • Issuer: OU = VeriSign Commercial Software Publishers CA
    O = VeriSign, Inc.
    L = Internet
  • Thumbprint: 7D7F 4414 CCEF 168A DF6B F407 53B5 BECD 7837 5931

Fraudulent Certificate 2

The second fraudulent certificate can be uniquely identified by the following properties on the Details tab:
  • Serial Number: 1B51 90F7 3724 399C 9254 CD42 4637 996A
  • Issuer: OU = VeriSign Commercial Software Publishers CA
    O = VeriSign, Inc.
    L = Internet
  • Thumbprint: 6371 62CC 59A3 A1E2 5956 FA5F A8F6 0D2E 1C52 EAC6

Complete Details of Fraudulent Certificates

For your reference, the complete details of these fraudulent certificates are provided in the following sections.

Fraudulent Certificate 1

The General tab contains the following information: Certificate Information

This certificate is intended for the following purpose(s):

  • Ensures software came from software publisher
  • Protects software from alteration after publication
* Refer to the certification authority's statement for details.

Issued to: Microsoft Corporation

Issued by: VeriSign Commercial Software Publishers CA (https://www.verisign.com/repository/CPS/)

Valid from 1/30/2001 to 1/31/2002
The Details tab contains the following information: Show:


  • Version
    V3
  • Serial number
    750E 40FF 97F0 47ED F556 C708 4EB1 ABFD
  • Signature algorithm
    md5RSA
  • Issuer
    OU = VeriSign Commercial Software Publishers CA
    O = VeriSign, Inc.
    L = Internet
  • Valid from
    Tuesday, January 30, 2001 7:00:00 PM
  • Valid to
    Thursday, January 31, 2002 6:59:59 PM
  • Subject
    OU = Microsoft Corporation
    CN = Microsoft Corporation
    L = Redmond
    S = Washington
    C = US
    OU = Digital ID Class 3 - Microsoft Software Validation v2
    OU = www.verisign.com/repository/CPS Incorp. by Ref.,LIAB.LTD(c)96
    OU = VeriSign Commercial Software Publishers CA
    O = VeriSign, Inc.
    L = Internet
  • Public key
    3081 8902 8181 00EE FA1F C9B0 43DF 7E75 814E 3171 910B FC15 9DD9 4A8A 51F5 0918 C67C C5F1 27C4 0162 FCBF FC84 29A6 2FE6 1E02 060B 9689 D342 B173 9F02 AE75 6209 3F83 8034 4660 390A E321 4EE7 0442 D57E 5E98 4527 5D04 B927 32C0 65A4 9485 1325 DB16 F2FB 51C7 FF28 62D1 8331 4FA9 A4F4 C54F 9D00 2E14 3F95 169C 4E25 071B D57D 3871 D840 F8AA 7102 0301 0001
  • Basic Constraints
    Subject Type=End Entity
    Path Length Constraint=None
  • Key Usage
    Digital Signature , Key Encipherment(A0)
  • Authority Key Identifier
    KeyID=7B96 E4D1 43FD 6898 F338 CC6E 3BF2 0B82
    Certificate Issuer:

    OU=VeriSign Commercial Software Publishers CA
    O="VeriSign, Inc."
    L=Internet
    Certificate SerialNumber=03C7 8F37 DB92 28DF 3CBB 1AAD 82FA 6710
  • Basic Constraints
    Subject Type=End Entity
    Path Length Constraint=None
  • Certificate Policies
    [1]Certificate Policy:
    
         PolicyIdentifier=2.16.840.1.113733.1.7.1.8
    
         [1,1]Policy Qualifier Info:
            
              Policy Qualifier Id=CPS
    
              Qualifier:
    
          
                   https://www.verisign.com/rpa
         
  • SpcFinancialCriteria
    Financial Information=Available
    Meets Criteria=Yes
  • Key Usage Restriction
    [1]Cert PolicyId=1.3.6.1.4.1.311.2.1.22
    Restricted Key Usage=Digital Signature(80)
  • SpcSpAgencyInfo
    Policy Information:

    URL=https://www.verisign.com/repository/CPS
    Policy Display=This certificate incorporates by reference, and its use is strictly subject to, the VeriSign Certification Practice Statement (CPS) version 1.0, available in the VeriSign repository at:
    https://www.verisign.com; by E-mail at CPS-requests@verisign.com; or by mail at VeriSign, Inc., 2593 Coast Ave., Mountain View, CA 94043 USA Copyright (c)1996 VeriSign, Inc. All Rights Reserved. CERTAIN WARRANTIES DISCLAIMED AND LIABILITY LIMITED.

    WARNING: THE USE OF THIS CERTIFICATE IS STRICTLY SUBJECT TO THE VERISIGN CERTIFICATION PRACTICE STATEMENT. THE ISSUING AUTHORITY DISCLAIMS CERTAIN IMPLIED AND EXPRESS WARRANTIES, INCLUDING WARRANTIES OF MERCHANTABILITY OR FITNESS FOR A PARTICULAR PURPOSE, AND WILL NOT BE LIABLE FOR CONSEQUENTIAL, PUNITIVE, AND CERTAIN OTHER DAMAGES. SEE THE CPS FOR DETAILS.

    Contents of the VeriSign registered nonverifiedSubjectAttributes extension value shall not be considered as accurate information validated by the IA.

    Policy Logo Link:
    URL=https://www.verisign.com/repository/verisignlogo.gif
  • Thumbprint algorithm
    sha1
  • Thumbprint
    7D7F 4414 CCEF 168A DF6B F407 53B5 BECD 7837 5931
The Certification Path tab contains the following information:
Certification path
VeriSign Commercial Software Publishers CA
Microsoft Corporation

Fraudulent Certificate 2

The General tab contains the following information:
Certificate Information

This certificate is intended for the following purpose(s):
  • Ensures software came from software publisher
  • Protects software from alteration after publication
* Refer to the certification authority's statement for details.

Issued to: Microsoft Corporation

Issued by: VeriSign Commercial Software Publishers CA (https://www.verisign.com/repository/CPS/)

Valid from 1/29/2001 to 1/30/2002
The Details tab contains the following information:
Show:
  • Version
    V3
  • Serial number
    1B51 90F7 3724 399C 9254 CD42 4637 996A
  • Signature algorithm
    md5RSA
  • Issuer
    OU = VeriSign Commercial Software Publishers CA
    O = VeriSign, Inc.
    L = Internet
  • Valid from
    Monday, January 29, 2001 7:00:00 PM
  • Valid to
    Wednesday, January 30, 2002 6:59:59 PM
  • Subject
    OU = Software
    CN = Microsoft Corporation
    L = Washington
    S = DC
    C = US
    OU = Digital ID Class 3 - Microsoft Software Validation v2
    OU = www.verisign.com/repository/CPS Incorp. by Ref.,LIAB.LTD(c)96
    OU = VeriSign Commercial Software Publishers CA
    O = VeriSign, Inc.
    L = Internet
  • Public key
    3081 8902 8181 009E 30E5 9341 8E11 0767 BABD C9C6 110A AB5A 4CD6 6D0C ADFA B30E A019 1C54 7FC5 2E29 CE7E DADE EB28 D5AD 1AB0 CAD5 B2F1 9B83 E23E 448F E997 2693 B36D 390C 6967 50B9 1498 7DA4 C342 66E3 8CFC DADB 89EC 9C6B 54DD 481C C4DD 2055 B7EA 2557 B6CE FCEB E087 62A1 85A9 1FCF F2FB 2094 9BDA E53D D6B9 80E9 06AF 31A6 CD7E B3CF B490 5502 0301 0001
  • Basic Constraints
    Subject Type=End Entity
    Path Length Constraint=None
  • Key Usage
    Digital Signature , Key Encipherment(A0)
  • Authority Key Identifier
    KeyID=7B96 E4D1 43FD 6898 F338 CC6E 3BF2 0B82
    Certificate Issuer:

    OU=VeriSign Commercial Software Publishers CA
    O="VeriSign, Inc."
    L=Internet
    Certificate SerialNumber=03C7 8F37 DB92 28DF 3CBB 1AAD 82FA 6710
  • Basic Constraints
    Subject Type=End Entity
    Path Length Constraint=None
  • Certificate Policies
    [1]Certificate Policy:

    PolicyIdentifier=2.16.840.1.113733.1.7.1.8
    [1,1]Policy Qualifier Info:
    Policy Qualifier Id=CPS
    Qualifier:

    https://www.verisign.com/rpa
  • SpcFinancialCriteria
    Financial Information=Available
    Meets Criteria=Yes
  • Key Usage Restriction
    [1]Cert PolicyId=1.3.6.1.4.1.311.2.1.22
    Restricted Key Usage=Digital Signature(80)
  • SpcSpAgencyInfo
    Policy Information:

    URL=https://www.verisign.com/repository/CPS
    Policy Display=This certificate incorporates by reference, and its use is strictly subject to, the VeriSign Certification Practice Statement (CPS) version 1.0, available in the VeriSign repository at:
    https://www.verisign.com; by E-mail at CPS-requests@verisign.com; or by mail at VeriSign, Inc., 2593 Coast Ave., Mountain View, CA 94043 USA Copyright (c)1996 VeriSign, Inc. All Rights Reserved. CERTAIN WARRANTIES DISCLAIMED AND LIABILITY LIMITED.

    WARNING: THE USE OF THIS CERTIFICATE IS STRICTLY SUBJECT TO THE VERISIGN CERTIFICATION PRACTICE STATEMENT. THE ISSUING AUTHORITY DISCLAIMS CERTAIN IMPLIED AND EXPRESS WARRANTIES, INCLUDING WARRANTIES OF MERCHANTABILITY OR FITNESS FOR A PARTICULAR PURPOSE, AND WILL NOT BE LIABLE FOR CONSEQUENTIAL, PUNITIVE, AND CERTAIN OTHER DAMAGES. SEE THE CPS FOR DETAILS.

    Contents of the VeriSign registered nonverifiedSubjectAttributes extension value shall not be considered as accurate information validated by the IA.

    Policy Logo Link:
    URL=https://www.verisign.com/repository/verisignlogo.gif
  • Thumbprint algorithm
    sha1
  • Thumbprint
    6371 62CC 59A3 A1E2 5956 FA5F A8F6 0D2E 1C52 EAC6
The Certification Path tab contains the following information:
Certification path
VeriSign Commercial Software Publishers CA
Microsoft Corporation


APPLIES TO
  • Microsoft Windows NT Server 4.0, Terminal Server Edition Service Pack 4
  • Microsoft Windows NT Server 4.0, Terminal Server Edition Service Pack 5
  • Microsoft Windows NT Server 4.0, Terminal Server Edition Service Pack 6
  • Microsoft Windows 2000 Service Pack 1
  • Microsoft Windows 2000 Advanced Server
  • Microsoft Windows NT Server 4.0 Standard Edition
  • Microsoft Windows NT 4.0 Service Pack 1
  • Microsoft Windows NT 4.0 Service Pack 2
  • Microsoft Windows NT 4.0 Service Pack 3
  • Microsoft Windows NT 4.0 Service Pack 4
  • Microsoft Windows NT 4.0 Service Pack 5
  • Microsoft Windows NT 4.0 Service Pack 6a
  • Microsoft Windows NT Server 4.0 Enterprise Edition
  • Microsoft Windows NT Workstation 4.0 Developer Edition
  • Microsoft Windows NT Workstation 4.0
  • Microsoft Windows Millennium Edition
  • Microsoft Windows 98 Second Edition
  • Microsoft Windows 98 Standard Edition
  • Microsoft Windows 95

How to cure Out Of Range Errors During Ubuntu Installation

How this error happens?

You should concentrate on graphic card settings during installation. This error is irrespective of the version of ubuntu you are using. When the preset resolution is more than that of the recommended one, out of range error occurs.


How can we bypass this error?

Pay close attention to the video card settings during installation. Set the resolution to 1024x768 during installation.

Is that possible to cure out of range errors after installation?

yes, you can cure this problem after installation, by pressing Ctrl-Alt-Numpad- and/or Ctrl+Alt+Numpad+ repeatedly; this will keep changing resolutions in an attempt to find one that works. You will have to wait about 2-3 seconds between each press. If you find a resolution that works, post back on how to make it permanent and/or how to get a suitable refresh rate at which ever resolution you like.

Usually, this error is related to the refresh rate being out of range of your monitor.

Steps for effective Cleaning of your P.C


There are a lot of scrap files which reduces your system performance. In order to overcome this, you should clean your P.C at least once a week. Off course anti virus programmes will help you to prevent intrusions and other attacks but it never improves your computer performance.

1) Clean the following directories first.

Start>>Run>> TemP

Start>>Run>>Prefetch

Start>>run>> %temp%


2) Download and install C-Cleaner. The C-cleaner has four main features which will help you to resolve almost all scraps in your system. The Cleaner tool will allow you to eliminate unwanted temporary files. The registry section will analyze the errors and it will fix windows registry automatically. The tools section helps you in managing start up application and managing system remove points.

Lot of users use NTFS file system rather than FAT32 file system since it supports large drives, offers better performance and encryption of files and folders. MFT means Master File Table which contains index of files on NTFs drives. As computer overwrite and delete files, MFT will be filled with free space which will contains index of pointers to deleted files, you can now set CCleaner to wipe this MFT free space.

C-Cleaner also wipes out MFT free Space. It will take some delay, but if you perform a weekly cleaning section, the delay will get reduced.

Run C-Leaner, after checking all boxes in the left pane.

You are done, just now you have cleaned your P.C effectively

How to get Any Windows password

This works whether its windows 2000 or windows xp or windows xp SP1 or SP2 or windows server 2003....

this works even if syskey encryption is employed...

if it is FAT filesystem...

just copy the sam file like stated in the first post to an empty floppy disk and take it home. I'll tell u what to do with it later... DON'T DELETE THE ORIGINAL SAM FILE. just remove its attributes. the sam file is a file called SAM with no extension. YOU MUST ALSO GET.... a file called SYSTEM which is in the same folder as SAM. both files have no extensions...

if it is NTFS....

u have to download a program called NTFSPro.... it allows u to read from ntfs drives... the demo version allows read only. the full version is read-write.... you use the program to create an unbootable disk (so u will still need another bootable disk and an empty disk) that has the required files to access NTFS.

use the boot disk to get into dos, then use the disks created with ntfspro to be able to access the filesystem, then copy the SAM and SYSTEM files to another empty disk to take home....

AT HOME: u have to get a program called SAMInside. it doesn't matter if it is demo version. SAMInside will open the SAM file and extract all the user account information and their passwords, including administrator. SAMInside will ask for the SYSTEM file too if the computer you took the SAM file from has syskey enabled. syskey encrypts the SAM file. SAMInside uses SYSTEM file to decrypt the SAM file. After SAMInside finishes, u still see user accounts and hashes beside them. the hashes are the encoded passwords. Use SAMInside to export the accounts and their hashes as a pwdump file into another program, called LophtCrack. it is currently in version 5, it is named LC5. the previous version, LC4 is just as good. u need the full or cracked version of the program. LC5 uses a brute force method by trying all possible combinations of letters numbers, and unprintable characters to find the correct password from the hashes in the pwdump file imported into it from SAMInside. This process of trying all passwords might take 5 minutes if the password is easy, up to a year if the password is long and hard (really really hard). LC5 howver, unlike LC4, is almost 100 times faster. both can be configured to try dictionary and common words before using all possible combinations of everything. Once the correct password is found, it will display the passwords in clear beside each account, including administrator.

I use this method so many times. I've compromised the whole school computer infrastructure. LC4 usually took between 1 second and 10 minutes to find the passwords because they were common words found in any english dictionary. I haven't used LC5 yet.

If there is anything unclear, anything I overlooked, plz tell me so that I can turn this into a very easy to follow tutorial to help anybody crack any windowz pass.

Programs needed: SAMInside (doesn't matter which version or if demo)
LC4 or LC5 (lophtcrack)( must be full version)
NTFSPro (doesn't matter if demo)
any bootdisk maker

Cracked or full version software can be found on any warez site. If u don"t know what that is or where to get the programs, post a message and I'll tell u or give them to u.

P.S: I might not keep track of this forum, because I'm going to create a new topic and post tutorial there. if u want to post, plz post there.

How To Get A Free I-pod Or Flat Screen Tv, check it out

First Off - Need To Know Facts
First off, I have to say that NO! This is not a scam of any type. The company offering this deal (Gratis Internet) is registered with the BBB (Better Business Bureau) and has been for quite some time. Gratis is also affiliated with big-name companies such as AOL, General Motors, Ebay, Columbia House, and many others. These companies would never affiate them selves with a fraudulent web site/company. Aside from all this, there is proof that this works. Many people have received their ipods already and many more will. I wrote this document to help spread the word to you and ofcouse to help my self get an iPod.


How it works..
The way FreeiPods work is actually very simple. You sign up at their site, then you get others to signup and complete a offer (usually free). An offer can be anything from buying something on a web site to signing up for a free trial for a ISP. When this happens FreeiPods makes money from the offer you sign up from (even if you didn't spend a dime). With this money they make, they are able to offer FREE iPods, Simple huh?

To get a free ipod, you must sign up at their site, then complete 1 (One) offer. After that, you have to get 5 (Five) people do the same thing, and since it usually doesn't cost anything to complete an offer, a friend should be more then willing to help you out. After you have completed 1 (One) offer and gotten 5 (Five) people to signup and complete a offer, you will be sent the ipod of you choice.


The steps to follow..

Step #1 (Signup)
The first step is to go to the web site and signup. You will be asked witch ipod you would like and for an e-mail address and to create a password on the first screen. Then you will be asked for your shipping info so they know where to send the ipod. The address to go to to signup is: How To Get A FREE iPod!

First Off - Need To Know Facts
First off, I have to say that NO! This is not a scam of any type. The company offering this deal (Gratis Internet) is registered with the BBB (Better Business Bureau) and has been for quite some time. Gratis is also affiliated with big-name companies such as AOL, General Motors, Ebay, Columbia House, and many others. These companies would never affiate them selves with a fraudulent web site/company. Aside from all this, there is proof that this works. Many people have received their ipods already and many more will. I wrote this document to help spread the word to you and ofcouse to help my self get an iPod.


How it works..
The way FreeiPods work is actually very simple. You sign up at their site, then you get others to signup and complete a offer (usually free). An offer can be anything from buying something on a web site to signing up for a free trial for a ISP. When this happens FreeiPods makes money from the offer you sign up from (even if you didn't spend a dime). With this money they make, they are able to offer FREE iPods, Simple huh?

To get a free ipod, you must sign up at their site, then complete 1 (One) offer. After that, you have to get 5 (Five) people do the same thing, and since it usually doesn't cost anything to complete an offer, a friend should be more then willing to help you out. After you have completed 1 (One) offer and gotten 5 (Five) people to signup and complete a offer, you will be sent the ipod of you choice.


The steps to follow..

Step #1 (Signup)
The first step is to go to the web site and signup. You will be asked witch ipod you would like and for an e-mail address and to create a password on the first screen. Then you will be asked for your shipping info so they know where to send the ipod. The address to go to to signup is:
CODE
http://www.freeiPods.com/default.aspx?referer=7498598


Step #2 (Referrals)
The second step is a little more tricky. This is the part where you have to get people to signup for ipods using you referral link. There are many ways to do this, ask some friends to do it, send out e-mails, post on forums, get on some conga lines, write a how-to like i did, I'm sure you will think of away to do it.


Step #3 (Offers)
An offer is when you signup for one of freeipod's affiliates, there are quite a few to choose from. This part is what stops most people from completing their freeipod offer. The reason being is that it sounds to good to be true, for example, you can signup for a completely free trial of AOL and get an ipod in return.. At first i didn't think this was legit, but after talking to a few people who have done it and had proof that it actually worked for them, i decided to give it a try and it worked.
I used the AOL offer, you actually don't need a credit card (however i did use one). If you signup and hit cancel when it asks for your credit card info, it should still work and give you credit, many people i know have tried this and it has worked. If you DO you a credit card, all you have to do is call AOL and cancel the trial after your offer has been approved by freeipods. This usually takes a day or so.


Step #4 (Wait)
Wait for freeipods to e-mail you, they will give you instructions on what to do from there.. It will just have you follow a link and then fill out your shipping info and then it will ship.


Step #2 (Referrals)
The second step is a little more tricky. This is the part where you have to get people to signup for ipods using you referral link. There are many ways to do this, ask some friends to do it, send out e-mails, post on forums, get on some conga lines, write a how-to like i did, I'm sure you will think of away to do it.


Step #3 (Offers)
An offer is when you signup for one of freeipod's affiliates, there are quite a few to choose from. This part is what stops most people from completing their freeipod offer. The reason being is that it sounds to good to be true, for example, you can signup for a completely free trial of AOL and get an ipod in return.. At first i didn't think this was legit, but after talking to a few people who have done it and had proof that it actually worked for them, i decided to give it a try and it worked.
I used the AOL offer, you actually don't need a credit card (however i did use one). If you signup and hit cancel when it asks for your credit card info, it should still work and give you credit, many people i know have tried this and it has worked. If you DO you a credit card, all you have to do is call AOL and cancel the trial after your offer has been approved by freeipods. This usually takes a day or so.


Step #4 (Wait)
Wait for freeipods to e-mail you, they will give you instructions on what to do from there.. It will just have you follow a link and then fill out your shipping info and then it will ship.

How to fix corrupted files in XP

// Introduction //
This tutorial has been made so people that are having problems with corrupted files, can learn how to fix them easy.

// Required //
+ Windows XP operating system
+ Windows XP cd

// Right to the tutorial //
+ Place the xp cd in your cd/dvd drive
+ Go to start
+ run
+ type in 'sfc /scannow' (without the ')

Now it should all load, and fix all your corrupted file on windows XP :)

How To Remove and Add Right-Click Menu Items from Files and Folders


A lot of programs you install will add themselves to the right-click menu of your files and/or folders. And most times, you have no choice in the matter and, as a result, your right-click menu can get very long with added items you don't even use. The last person I was helping with this had a right context menu so long that the Rename option was no longer visible!
Fortunately, you can easily remove those unwanted menu items, if you know the registry values to edit. And it's not at all difficult once you know the keys responsible for the additions.

For Files, the secret lies in the "context menu handlers" under the shellex subkey for "All Files" which, in the registry, is nothing but an asterisk - like a dos wildcard, which means the values entered apply to all files. It is at the very top of the Root key, right here:

HKEY_CLASSES_ROOT\*\shellex\ContextMenuHandlers

Click the the + sign next to the ContextMenuHandlers key, to expand it.
Now you will see some of the programs that have added items to your right-click menu. Simply delete the program keys you don't want.
Yup! It's that simple. If deleting makes you uneasy, just export the key before deleting it. Or, instead of deleting the values, disable them. Simply double click the default value for the program on the right hand pane and rename the clsid value by placing a period or dash in front of it.
ie; - {b5eedee0-c06e-11cf-8c56-444553540000}
Then exit the registry, refresh, and right click a file to see if the item was removed from the menu.
Some programs - like WinZip or WinRar - will add several items to your right click menu but all of them will be removed by deleting or disabling their one context menu handler.

Note that the above key only applies to the right click menu of files.
To remove entries from the right click context menu of folders, you need to navigate to the Folder and Drive keys:

HKEY_CLASSES_ROOT\Folder\shellex\ContextMenuHandlers
HKEY_CLASSES_ROOT\Drive\shellex\ContextMenuHandlers


All you have to do is follow the same procedure as for Files - either disable or delete items you wish to remove.
Adding Items
Adding Items to the right click menu of Files and Folders is also fairly simple using the Registry. It just involves the creation of a few new keys for each item you wish to add. You edit the same keys used for removing items. Let's use Notepad as an example of an item you'd like to add to the right click menu of all your files or folders.

For folders, go to this key:
HKEY_CLASSES_ROOT\Folder
Click the + sign next to Folder and expand it so that the Shell key is visible. Right click the Shell key and choose New>Key and name the key Notepad or whatever else you'd prefer (whatever the key is named is what will appear in the right-click menu). Now right click the new key you made and create another key named Command. Then, in the right hand pane, double click "Default" and enter Notepad.exe as the value.
Exit the registry, refresh, and right click any folder. Notepad should now be on the context menu.


For files, go here again:

HKEY_CLASSES_ROOT\*
Expand the * key and see if a Shell key exists. If it does exist, follow the same procedure as for folders. If it does not exist, you'll have to create a new Shell first. Just right click the * key and choose New>Key and name it Shell. Then right click the Shell key and continue on the same way you did for adding items to the right click menu of folders.

How to Download-Upload Files from email

This technic is really a newly powerfull way of downloading movies games... Nothing to worry about the fu***** deleters and all the jerks!

Enought bullshit lets get down to buisness:

First of all u need to have a big mail box. here are the one which we can cover. click on the icon to go to the website

• Gmail (Google mail)
• Storage space - 1GB
• Maximum attachment size - 10MB
Image
www.gmail.com

• Walla! mail (the best)
• Storage space - 1GB
• Maximum attachment size - 7MB
Image
www.walla.com

• Spymac Mail
• Storage space - 1GB
• Maximum attachment size - 10MB
Image
www.spymac.com

• Unitedemailsystems
• Storage space - 3GB
• Maximum attachment size - 10MB
Image
www.unitedemailsystems.com

• Xasamail
• Storage space - 2GB
• Maximum attachment size - 10MB
Image
www.xasamail.com


• Omnilect Mail
• Storage space - 2GB
• Maximum attachment size - 7MB
Image
www.omnilect.com

------------------------------------------------------------
Image

Then download the software called peer to mail:
http://dw.com.com/redir?pid=10351095&merid=72949&mfgid=72949&lop=link&edId=3&siteId=4&oId=3002-2196_4-10351095&ontId=2196&destUrl=http%3A%2F%2Fwww.peer2mail.com%2FP2MSetup.exe

official website:
http://www.peer2mail.com
--------------------------------------------------------------
Next step : configurate the soft

go in settings > SMTP server setting

and give an smtp adress that u know

Ex: smtp.laposte.net
user : HULK
pass: ******

Once configurated u don't need to touch it for the rest pf ur upload
Image

This is a critical step, if u are experimenting any pb of connexion this is were u need to have a look:

This is possible that temporaly ur internet provider dont allow u to use other smtp adress than his. So use it
ie:
smtp.free.fr
smtp.wanadoo.fr
(these are french one I don't know of which one u are using)
...

If u are experimenting any pb it is better to desactivate ur antivirus (the scanning mail option)

Image


----------------------------------------------------------

Image

1 - Click on Splint/Send File.
2 - Click on the icon (choose a file to send.....).
3 - select the archive that u want to upload it.
4 - type the address of ur account (email).
5 - It determines the size of the parts that the archive will be divided ( take a look at the max size used by ur mail) i advise u to put a size of 6MB.
6 - It determines the type of sending. "send via smtp server"

After all that, press OK.

===========

press the selected button in the figure:

Image

===========

After all the parts have been sent,go to ur account (email) and confirms, then u have to bring the Encrypted password follows the example below:

Image

===========


Always give the following information to the users:
follows the example below:

Email: GMail
Login: zezão
Password: |/kjds42d4sd24 \|

remmember:
- only Encrypted Password, never sends ur true password

--------------------------------------------------

Be careful : never post ur coordinates without having previously verifyed the content in the mailbox

sometimes peer2mail tells u that evrything is sent but It can happens that nothing is sent


---------------------------------------------------------------------------------------------------------

U want to download games and movies with a good speed ( thats what we all here for!)

So here is an easy way to download large files from mailbox

----------------------------------------------------
first download peer to mail

Image

official website:
http://www.peer2mail.com
----------------------------------------------------

Open it and go to the browse tab

---------------------------------------------------

then take the coordinates of the film/game u want to download

in this tutorial i'll use the film mulan :

mail: walla.com
login: dragon_mushu
pass: <(/++EiJPy)>

--------------------------------------------------
U noticed that the mail used is walla.com

so go to www.walla.com with the adress bar or with the prerecorded website (see picture)

Image

login with:
"dragon_mushu" & "<(/++EiJPy)>"

Image
----------------------------------------------------
go into the inbox then click on this icon:
Image

this wil do this:
Image

after uve retrieve all the segment click on "download"
------------------------------------------------------

If everithing is fine the movie will be merge automatically
and u won't need to care about the segments

------------------------------------------------------

If u look for a place to share/download movies/games using peer2mail just go to the peer2mail website www.peer2mail.com. Then go to the forum and click on "peer2mail related websites".

here is the direct link (may not work)
http://www.peer2mail.com/forums/viewforum.php?f=13

----------------------------------------------------------------------

Here u are now u should be an expert on peer2mail!!!
-----------------------------------------------------------------------------------------------------------------

Peer2Mail is the first software that let you store and share files on any web-mail account. If you have a web mail account with large storage space, you can use P2M to store files on it. Web-mail providers such as Gmail (Google Mail), Walla!, Yahoo and more, provide storage space that ranges from 100MB to 3GB.
P2M splits the file you want to share/store zips and encrypts it. P2M then sends the file segments one by one to your account. Once P2M uploaded all file segments, you can download them and use P2M to merge the segments back to the original file.

Sending a File


In order to send a file to an email account, Peer2Mail needs to split it into segments. Web-mail providers limit the size of an email attachment usually to a nominal 10Megs, but due to the size increase resulting from transport encodings, the limit works out to be a few MB less (Usually 7MB). Use the following dialog to prepare the file before sending:

* File Name - The file/s you want to send. You can use the Browse button to select a single or multiple files.

* Mail To - The recipients who will receive the file (Web-mail account). When using Direct Send you may enter only one email address. If you are sending Via MAPI then you can enter as many recipients as you like; Use the Recipients button to easily add email address separated by semi colon (icon_wink.gif.

* Optional Encryption Password - P2M automatically encrypts each segment to protect you privacy, however you can set a password (key) for the encryption to maximize the privacy. You will need this password when you merge the segments back.

* Segment Size - P2M splits the file into segments. Here you can determine the segment size, most of the web-mail providers limit the attachment size to a nominal 10Megs, but due to the size increase resulting from transport encodings, the limit works out to be a few MB less (Usually 7MB). It is recommended to test your web-mail provider for the size of an attachment it can receive.

Send Method -

o Direct Send - P2M has a built in SMTP component that sends the segments directly to the web-mail providers. You don't need to enter your ISP details in order to use P2M. If you are using this feature please make sure you enter a value in the 'From Email Address' because some web-mail providers reject email messages where there is no 'From' address. You can even enter a fake mail address.

o Send Via MAPI - P2M can send the segments using MAPI (Usually your outlook client). When you use this option P2M will split the files and move the sending responsibility to Outlook. Note that it will use your ISP SMTP server and details to send the files. You may enter as many recipients as you wish when using this option.

o Send Via SMTP Server - Send the segments using your ISP SMTP Server. If you are using this feature please make sure you enter a value in the 'From Email Address' because some web-mail providers reject email messages where there is no 'From' address. You can even enter a fake mail address. You may enter as many recipients as you wish when using this option.

* From Email Address - This is the source address of the mail. This address doesn't have to be valid, although sometimes web-mail providers reject emails where the domain part of the address isn't valid.

Image

Once you are done, click on the Ok button. You can now choose if you want P2M to send all the segments or only specific few by checking/un-checking the checkboxes. Once you are ready, click on the Send button. It may take a few hours to complete the operation depending on the file size and your internet connection.
Note: If you are using an antivirus program that scans outgoing mail, it is recommended to disable this feature since it takes a long time for each segment to be scanned.


Plain Transfer

In case you don't want Peer2Mail to split, zip and encrypt your files, and just want to send the files "as is�" then you can use Plain Transfer. This option isn't secure. P2M just sends the file as an email attachment and some web mail providers might even block it.

Choose Plain Transfer from the drop down button: Image.
Once you are done filling the details as described above, click on the Ok button. Once you are ready, click on the Send button.
Note: If you are using an antivirus program that scans outgoing mail, it is recommended to disable this feature since it takes a long time for each segment to be scanned.


Downloading the Segments

P2M includes a built in browser so you can easily log into your web-mail account. Before you can merge the segments you need to download them. It is important that you will save all the segments into the same folder. The first segment name ends with the P2M extension and the rest follow with a serial number 001...00x.

Auto Download

Peer2Mail can automatically list and download files from web-mail accounts. Currently P2M supports auto-download from Gmail, Walla, Yahoo, Spymac, Unitedemailsystems, Xasamail, Gawab, Hriders and Omnilect. To use this feature, login to your account and click on the green download button (Image). P2M will then list the segments (may take a few minutes) and at any time you can tell P2M what segment to download by clicking on the checkboxes that appear next to them. Click on the Download button to begin downloading the selected segments.
If you checked the Auto Merge checkbox then Peer2Mail will automatically merge the segments once the download process is done
Image

The listing process can be a bit slow since P2M scans the mail account and gathers information about each attachment. Sometimes a server doesn't reply to a request so P2M might skip it. To fix that, once the listing process is over, click on the refresh button and P2M will re-index only the segments it didn't already list.
P2M scans for segments only in the inbox for Yahoo, Walla, Spymac, Unitedemailsystems, Xasamailand, Gawab, Hriders, Omnilect, and on all folders with Gmail.

Merging the Segments


Once you completed downloading all the segments, use P2M to merge it back to the original file. Choose the folder you want the file to be saved in and click on the Merge button. The Merge dialog:

# P2M File/s - use the Browse button to select the first segment of the file you wish to merge. The first segment extension is P2M.

# Decryption Password - If you used a password when you sent the file to your account, you must enter it now in order to merge it back. Incorrect password will result in a failure to merge the segments.

How To Download Directly From Crackdb.com

Some of you may not know this, others may already knew it, however, becauseof Sod rules which do no not allow indirect crack links, and because CrackDB is a very good resource for cracks, i will show how to post links that lead to a direct download from CrackDB.

The CrackDB server sends the archive of a crack as an attachment to the respond for an HTTP request made by your browser, this means you (and your browser) will never know the real location of the file, because of this you can't post a direct link to the crack in your topic.

Using the Referer variable we can overcome this problem, but what referer to
use? if you used the domain name http://www.crackdb.com/
you will get nothing but a useless image file.

The correct refere is shown on your browser address bar. For example, if you want the crack for IsoBuster Pro v1.6 you just type the name in the search box and press Enter, the next page displays a list of items that match or nearly match your search keywords, click on IsoBuster Pro v1.6 from the list andyou are now in the download page, the hyperlink named "Download" is the link that initiates the request to the server to download the file, which looks
like this:

http://www.crackdb.com/x.php?id=12356


The referer is now displayed on your browser address bar, which looks like this:

http://www.crackdb.com/get.php?id=12356


Now, you use both links to refer to a direct crack download from CrackDB, like this
Fix:

http://www.crackdb.com/x.php?id=12356
Use this referer:
http://www.crackdb.com/get.php?id=12356


Any member now can copy & paste the links into his/her download manager and
start downloading immediatley.

I hope you find something usefull here. Thanx for reading this.

How to Create a High Quality DVD Rip

First and foremost, go to
http://www.doom9.org

and go to their downloads section.
get the following files:
under Audio:
Besweet
Besweet GUI

Under Codecs:
DivX 5.2.1 Pro

Under Divx/Mpeg-4 encoders:
Nandub 1.0RC2


then get this:
http://www.dvd-digest.tv/downloads/files/virtualdub/vdub_pack-145.exe
alternatively, get any version of virtualdub that includes mp3 support.

these are all the required tools, there are ways with fewer items, but they produce very inferior outputs. Besides, after you get used to it, the whole process is really easy.


Okay, first and foremost, pull out Nandub. This is the step that takes the longest, as well as where you will make most of your decisions. I am going to assume that you are making a 1 cd rip. If you do what is in this faq, there won't be much reason to do anything else. Twisted Evil

First of all, run Nandub . It will pop up a dialogue box, and want to know if you are making a new project or resuming an old. New, of course. Give it a name and tell fairuse where you want it to store its data. Fairuse is about to rip the entire movie to your harddrive(nice if you want to go rent a movie and return it the next day).

Then it will ask for your DVD drive with a dvd in it. give it. Then, select which video stream you want. This is usually pretty obvious as the movie stream is the one that is an hour or so long. If there are two of these, check out the other tags. which languages and so on. worst case senario is that you have to trial and error. but that is rare. choose the long stream and hit next.

This is where Nandub rips everything to your hard drive. depending on the speed of various components in your computer, and the length of the movie, this could take a while. let it finish. and then move on.

Once all that is done, the really important screen pops up. this is where you set resolutions and video length. first, cut off the ending credits with the slider, but DO NOT mess with the beginning, as the sound and video frames need to start at the same point for sync. Then hit auto set for the cropping region, this is usually just fine. Then decide whether or not you want subtitles, which would be the subpicture stream. When you're done, hit next.

Set the field mode to IVTC. This will give you better quality for size, as it runs at 24 frames instead of 30, due to the nature of divx, there won't be any noticeable difference in quality, but 6 less frames to deal with each second(and to store data for) really add up. Besides this is the correct mode for all movies anyway. NExt.

This is where you set FINAL file size, including audio, for 1 cd rip, set to 690, for 2, set to double that. Then follow the directions they give you and choose a final resolution that has between a 120:1 and 150:1 (if possible, sometimes the movie is compression ratio. NEXT!

This screen is where you determine quality. The autoadd button is usefull, and will give you decent quality, with 4 encodings. What this does is encode the movie 4 times, and then mix the frames to creat the final encoding, with the most efficient possible encoding for each frame. which is how we get bad ass quality for a single cd. I usually go for 8 encodings, as on my athlon 1600+ this rarely takes more than 8 hours to do, so I just go to sleep, wake up, and its done.

Then add the audio encoding that you want.

Hit next.
And let the bastard fly. Depending on what you set, and your computer, this could take from a few hours to a few days. CPU's of 1.2Ghz+ are nice right about here. You can do stuff while this is going on, but it makes things take much longer.

In the end you will have a bunch of encodings in the folder you specified at the beginning, the 4+ you chose and the final. You will also have an AC3 stream. Take the final AVI and toss it someplace to await the rest of the audio work you have to do, and you can erase the other encodings, freeing up a few gigs in the process of space.

NEXT: AUDIO

Ok, this is where Besweet comes in.

Extract BeSweet and the GUI into the same folder. Now Run the GUI.

At the top there are three fields. One for BeSweet which you should point at the besweet.exe that you should have unzipped to the same directory you are running the Gui from, A field for the AC3 stream, which is in the folder where you sent the encoded video from Fairuse, and an output mp3. The output mp3 has to be an existing file, so make a text file, rename it (yourmovie).mp3 and just say yeah, its cool to change the extension and make things weird. besweet will overwrite it so don't worry. point the third field at that file. The default values for stuff should be fine. but to make sure go to Azid 1(on the left) and select stereo, and then go to Lame 2 and select constant bit rate, and 128(assuming that is what you want). then click on besweet again, and finally, click on AC3 to MP3.

Let the bastard fly.

Now. When its done you should have an mp3 that is the entire soundtrack for the movie. This is where virtualdub comes in. run the virtualdub mp3 version. go to File:open video file and select the final encoding that you had from way back. Then go to audio and select mp3 audio. it will ask you for the file, give it the mp3. Go to audio again and make sure direct stream copy is selected. Then go to video and make sure that direct stream copy is also selected. Finally go to file again and SAVE AVI. give it a file name and let the bastard fly. This final file is your movie. Beautiful and glorious. Congratulations, its a DivX rip. Aren't you proud. burn to cd, and give copies to all your friends.

How To Copy A Dvd Which Will be Compatible with A X Box

TOOLS YOU WILL NEED:

DVD decrypter
DAEMON TOOLS
DVD2ONE
NERO 5.5.10 or above.

1. Rip the DVD in ISO mode with DVD decrypter to your hdd.
(mode=ISO-read)

2. Right click DEAMON TOOLS icon on your desktop
virtual cd/dvd rom
Device 0 [k] no media
Mount Image - ISO file

3. Make a main folder ( title MOVIE ) on your desktop.
make 2 subfolders in it VIDEO_TS and AUDIO_TS

4. Open DVD2ONE. choose movie only or entire disc.
source - drive you mounted in step 2 (VIDEO_TS)
Destination - VIDEO_TS folder you created in step 3.
start

5. DEAMON TOOLS - unmount the drive you made in step 2.
you can now delete the ISO file to save disc space

6. open NERO
close wizard
New Compilation DVD
Left Column (DVDROM/UDF/ISO)
No Multisession
UHF check Force DVD compatability (required for x box)
Label ( NAME OF MOVIE ) ALL CAPITAL LETTERS
Click New
drag over the VIDEO_TS FOLDER and AUDIO_TS folder you made
BURN

How to copy songs from your iPod to your PC

A reader points out a straightforward way for Windows users to transfer music from an iPod to your hard drive, without extra software:

  1. Connect the iPod to your PC. If iTunes starts syncing (ie erasing) your music automatically, hit the X in the upper right hand corner of iTunes display, to the left of the search box, to stop it.
  2. In Control Panel, Portable Media Devices, double-click your iPod.
  3. Navigate to the Music folder.
  4. Select all the music folders, and drag and drop them into a folder on your hard drive, or directly into iTunes.

And you’re done! The iPod music folder structure is strange and inexplicable, but once you move your files into iTunes you can set it to automatically organize your folder by artist and album to clean that up. (To do this, in iTunes Edit menu, choose Preferences and in the Advanced tab, check “Keep iTunes Music Folder organized.”)

If you give this a go, lemme know how it goes. I’ll ammend the instructions with any additional info for other versions of Windows and iPods.


Just for the record, I did not write this article, but I would have known how to do this. But one thing I ahve noticed is that you do not need to go into the control panel. Instead just make explorer.exe show hidden folders. Then, navigate into the iPod directory, go into iPod_control, and follow step four of the article. Software